Constructing your own smoker is a fantastic endeavor for pitmasters who love DIY projects and take pride in not only cooking the food but also building the smoker it’s cooked in!
Before diving into the project, it’s crucial to determine the type of smoker you want to build.
To kick-start your journey, we’ve compiled this list of 4 DIY smoker builds for you to explore.
- Old Trash Can Smoker
- Flowerpot Smoker
- 55-Gallon Drum Smoker
- Vertical Brick BBQ Smoker
With a diverse range of homemade smoker styles, we’ve made it easier for you to decide by including the necessary tools and providing links to step-by-step guides that walk you through the building process. Enjoy your creative journey!
- How To Build a Smoker Using an Old Trash Can? (with video)
- DIY Flowerpot Smoker(with video)
- Create Your Own 55-Gallon Drum Smoker(with plans)
- DIY Vertical Brick BBQ Smoker(with plans)
How To Build a Smoker Using an Old Trash Can?
Transforming an Old Garbage Can into a Smoker: Believe it or not, you can repurpose an old garbage can into a functional smoker.
However, make sure to clean it thoroughly before using it for this purpose.
If you’re purchasing a new one, opt for a can without paint or epoxy coatings to avoid giving your meat an unpleasant taste.
To build your very own garbage can smoker, you’ll need the following items:
- An old garbage can with a lid
- A barbecue grill grate with a similar circumference as your garbage can (it can be slightly smaller)
- A wood chip box
- An electric hot plate
- A drill
Follow these steps to create a unique and efficient garbage can smoker:
Step 1: Drill a hole on one side of the garbage can near the bottom. Ensure it’s large enough for the hot plate’s electrical cord to pass through.
Step 2: Place the electric hot plate at the bottom of the garbage can and run its cord through the hole you drilled. This hot plate will act as your smoker’s firebox.
Step 3: Position the wood chip box on top of the hot plate. Fill it with your preferred wood chips, which will provide flavor to your meat as the hot plate heats the contents of the box.
Step 4: Attach the barbecue grate at the opening of the garbage can. Ideally, choose a grate that’s almost the same size as the can’s mouth.
While you may consider welding the grate onto the can, keep in mind that the wood chip box is at the bottom, so it needs to be easily removable.
If you decide to weld the grate in place, create an opening near the wood chip box for easy access when adding pellets or wood to your smoker.
DIY Flowerpot Smoker: A Unique and Simple Solution for Smoking Meat
You can quickly create your very own DIY flowerpot smoker with just a few simple materials and tools.
Head to your local garden center and grab a pair of clay flower pots to get started on this unique and easy project.
Here’s what you’ll need:
- Two clay flower pots
- BBQ gasket tape (optional)
- U-Bolt (with nuts and washers)
- Wine corks
- Circular grill grate
- Small BBQ charcoal grate
And these are the tools you’ll require:
- Drill
Follow these steps to build your flowerpot smoker:
- Drill airflow holes in both clay pots, starting with a smaller drill bit and gradually increasing the size to avoid cracking the pots.
- Shave down a couple of wine corks so they can fit snugly in the air holes to control airflow.
- Place a brick at the bottom of one pot, which will act as the charcoal holder. Put the small BBQ charcoal grate on top of the brick.
- Drill two holes in the bottom of the second pot and install a standard U-bolt as a handle. This top pot will hold in the smoke.
- If available, use BBQ gasket tape to create a better seal between the pots, but it’s not essential.
- Add started coals on the grate in the bottom pot, followed by soaked wood chips. Place your food on the circular BBQ grill grate above the coals and put the top pot on to seal it.
Create Your Own 55-Gallon Drum Smoker: A Simple and Affordable DIY Project

This basic smoker, created from a 55-gallon food-grade drum, can be built in just a few hours without any welding. Here’s what you’ll need to get started:
Materials:
- 55-gallon epoxy-free food-grade drum with lid
- 4x 24-inch-long ¾-inch threaded pipes
- ¾-inch threaded 90-degree elbow joints
- 12 x 48-inch piece of expanded metal mesh
- Fine sandpaper
- Various fittings (refer to a step-by-step guide)
Tools:
- Angle grinder
- Drill
- Vise
- Wrench
- Cutting table
To build your ugly drum smoker, follow these steps:
- Source a 55-gallon drum, either new or used. Make sure it’s food-grade and doesn’t have an epoxy coating to avoid toxic fumes during use.
- Thoroughly clean the drum and buff its insides with fine sandpaper.
- Attach four air intakes using plumbing supplies, such as threaded pipes and 90-degree elbow joints.
- Build a fire basket from the expanded metal mesh.
- Attach a handle to the lid of the drum.
Once you’ve gathered your materials and tools, you can have your DIY ugly drum smoker assembled in the afternoon. The best part? No welding is required!
For a detailed, step-by-step guide on building your own ugly drum smoker, visit Popular Mechanics’ website at the following link:>> popularmechanics.com
DIY Vertical Brick BBQ Smoker
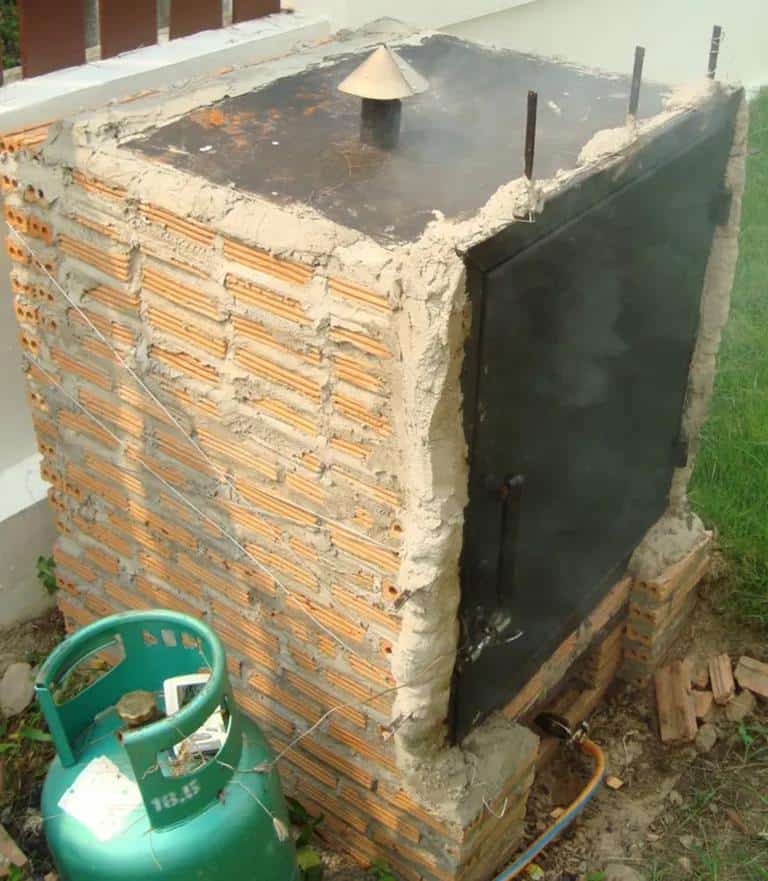
If you’re looking for a medium-large capacity BBQ smoker that doesn’t break the bank, a DIY vertical brick BBQ smoker might be just the project for you.
With a gas heat source and efficient use of wood chips, this smoker is not only enjoyable to build but also to use.
- Materials: Bricks, rebar, sand, cement, angle irons, metal pieces, gas burner, heavy cast iron pan, steel door, steel roof
- Tools: Shovel, trowel, drill
- Skills: Bricklaying
- Highlights: Sturdy construction, efficient use of space, customizable design
The Build Process:
- Foundation: Dig down about eight inches, cover with leveled sand, and create a concrete foundation with medium rebar for reinforcement. Let it cure for a few days to gain strength.
- First Layer of Brickwork: Once the foundation is solid, lay a double course of bricks, forming a square base. The outer sides should be around 90 cm, and the interior dimensions should be approximately 70 cm.
- Second, Third, and Fourth Layers: Build up the layers, leaving a gap in the front for the gas burner. Use angle irons to bridge the gap and continue with the brickwork.
- Building It Up: After completing the base, continue laying bricks on the sides and back until you reach a height of about 1.15 meters. Insert small metal pieces in the mortar between bricks to support removable grates for holding meat.
- Roofing and Dooring: Attach a fabricated steel door and roof to the structure. Secure the door using heavy gauge wire, and apply concrete to the roof edges and door frame for added stability.
- Consult experts if you have safety concerns.
- Ensure the chimney is at the highest point to let the gas out efficiently, preventing gas build-up and potential explosions.
- Use a burner designed to withstand high temperatures, and seek advice from your local BBQ specialty store if needed.
For a detailed, step-by-step guide on building your own DIY Vertical Brick BBQ Smoker, visit Dengarden’s website at the following link:>> dengarden.com
Related >> How to Use a Charcoal Smoker (7 Easy Steps)
Final Thoughts
Constructing a DIY smoker is not only a fulfilling and budget-friendly undertaking but also offers a project to suit every skill set and financial plan.
Regardless of whether you’re a seasoned pitmaster or just starting out, take the plunge into one of these do-it-yourself smoker builds.
Relish the sense of accomplishment that comes from preparing mouth-watering smoked dishes in a smoker you crafted with your own hands.
>> Visit our extensive BBQ guides page for more articles that are similar to this one.
Greetings! I’m Chad, a 43-year-old barbecue aficionado hailing from the beautiful state of Texas. I’m thrilled to invite you on a culinary journey as we explore the art of grilling and smoking together. Through this blog, I aim to ignite your passion for barbecue by offering:
Scrumptious, time-honored BBQ recipes passed down through generations, guaranteed to tantalize your taste buds.
Expert guidance on mastering the grill, smoker, and diverse cooking techniques to elevate your barbecue game.
Recommendations on choosing the perfect tools and equipment tailored to your grilling requirements.
An inside look at the latest trends, innovations, and advancements in the ever-evolving world of barbecue.


")

